In-the-Lab: Full ESX/vMotion Test Lab in a Box, Part 3
August 21, 2009In Part 2 of this series we introduced the storage architecture that we would use for the foundation of our “shared storage” necessary to allow vMotion to do its magic. As we have chosen NexentaStor for our VSA storage platform, we have the choice of either NFS or iSCSI as the storage backing.
In Part 3 of this series we will install NexentaStor, make some file systems and discuss the advantages and disadvantages of NFS and iSCSI as the storage backing. By the end of this segment, we will have everything in place for the ESX and ESXi virtual machines we’ll build in the next segment.
Part 3, Building the VSA
For DRAM memory, our lab system has 24GB of RAM which we will apportion as follows: 2GB overhead to host, 4GB to NexentaStor, 8GB to ESXi, and 8GB to ESX. This leaves 2GB that can be used to support a vCenter installation at the host level.
Our lab mule was configured with 2x250GB SATA II drives which have roughly 230GB each of VMFS partitioned storage. Subtracting 10% for overhead, the sum of our virtual disks will be limited to 415GB. Because of our relative size restrictions, we will try to maximize available storage while limiting our liability in case of disk failure. Therefore, we’ll plan to put the ESXi server on drive “A” and the ESX server on drive “B” with the virtual disks of the VSA split across both “A” and “B” disks.
Our VSA Virtual Hardware
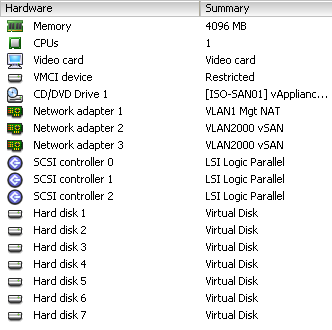
For lab use, a VSA with 4GB RAM and 1 vCPU will suffice. Additional vCPU’s will only serve to limit CPU scheduling for our virtual ESX/ESXi servers, so we’ll leave it at the minimum. Since we’re splitting storage roughly equally across the disks, we note that an additional 4GB was taken-up on disk “A” during the installation of ESXi, therefore we’ll place the VSA’s definition and “boot” disk on disk “B” – otherwise, we’ll interleave disk slices equally across both disks.

- Datastore – vLocalStor02B, 8GB vdisk size, thin provisioned, SCSI 0:0
- Guest Operating System – Solaris, Sun Solaris 10 (64-bit)
- Resource Allocation
- CPU Shares – Normal, no reservation
- Memory Shares – Normal, 4096MB reservation
- No floppy disk
- CD-ROM disk – mapped to ISO image of NexentaStor 2.1 EVAL, connect at power on enabled
- Network Adapters – Three total
- One to “VLAN1 Mgt NAT” and
- Two to “VLAN2000 vSAN”
- Additional Hard Disks – 6 total
- vLocalStor02A, 80GB vdisk, thick, SCSI 1:0, independent, persistent
- vLocalStor02B, 80GB vdisk, thick, SCSI 2:0, independent, persistent
- vLocalStor02A, 65GB vdisk, thick, SCSI 1:1, independent, persistent
- vLocalStor02B, 65GB vdisk, thick, SCSI 2:1, independent, persistent
- vLocalStor02A, 65GB vdisk, thick, SCSI 1:2, independent, persistent
- vLocalStor02B, 65GB vdisk, thick, SCSI 2:2, independent, persistent
NOTE: It is important to realize here that the virtual disks above could have been provided by vmdk’s on the same disk, vmdk’s spread out across multiple disks or provided by RDM’s mapped to raw SCSI drives. If your lab chassis has multiple hot-swap bays or even just generous internal storage, you might want to try providing NexentaStor with RDM’s or 1-vmdk-per-disk vmdk’s for performance testing or “near” production use. CPU, memory and storage are the basic elements of virtualization and there is no reason that storage must be the bottleneck. For instance, this environment is GREAT for testing SSD applications on a resource limited budget.
Installing NexentaStor to the Virtual Hardware
With the ISO image mapped to the CD-ROM drive and the CD “connected on power on” we need to modify the “Boot Options” of the VM to “Force BIOS Setup” prior to the first time we boot it. This will enable us to disable all unnecessary hardware including:
- Legacy Diskette A
- I/O Devices
- Serial Port A
- Serial Port B
- Parallel Port
- Floppy Disk Controller
- Primary Local Bus IDE adapter
We need to demote the “Removable Devices” in the “Boot” screen below the CD-ROM Drive, and “Exit Saving Changes.” This will leave the unformatted disk as the primary boot source, followed by the CD-ROM. The VM will quickly reboot and fail to the CD-ROM, presenting a “GNU Grub” boot selection screen. Choosing the top option, Install, the installation will begin. After a few seconds, the “Software License” will appear: you must read the license and select “I Agree” to continue.
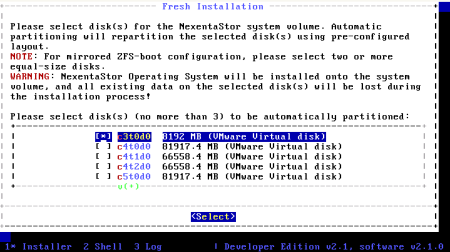
The installer checks the system for available disks and presents the “Fresh Installation” screen. All disks will be identified as “VMware Virtual Disk” – select the one labeled “c3t0d0 8192 MB” and continue.

The installer will ask you to confirm that your want to repartition the selected disks. Conform by selecting “Yes” to continue. After about four to five minutes, the NexentaStor installer shoud be asking you to reboot, select “Yes” to continue the installation process.
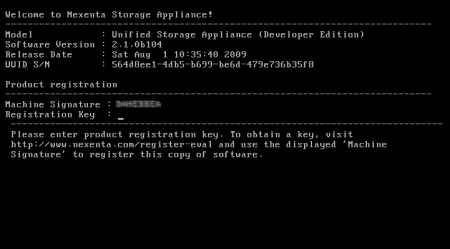
After about 60-90 seconds, the installer will continue, presenting the “Product registration” page and a “Machine Signature” with instructions on how to register for an product registration key. In short, copy the signature to the “Machine Signature” field on the web page at http://www.nexenta.com/register-eval and complete the remaining required fields. Within seconds, the automated key generator will e-mail you your key and the process can continue. This is the only on-line requirement.

Note about machine signatures: If you start over and create a new virtual machine, the machine signature will change to fit the new virtual hardware. However, if you use the same base virtual machine – even after distroying and replacing the virtual disks, the signature will stay the same allowing you to re-use the registration key.
Next, we will configure the appliance’s network settings…


[…] subsequent virtual ESX/ESXi instance(s). We will provision the storage similarly to the NFS storage we created in Part 3 of this series. To activate this file system, we need to go back to the NexentaStor web GUI and select “Data […]
LikeLike
[…] business problems… « In-the-Lab: Full ESX/vMotion Test Lab in a Box, Part 1 In-the-Lab: Full ESX/vMotion Test Lab in a Box, Part 3 » In-the-Lab: Full ESX/vMotion Test Lab in a Box, Part 2 August 19, 2009 In Part 1 […]
LikeLike
[…] Easy as 1,2,3Preview: Install ESXi 4.0 to FlashIn-the-Lab: Full […] by In-the-Lab: Full ESX/vMotion Test Lab in a Box, Part 3 « SolutionOriented Blog September 29, 2009 at 7:08 […]
LikeLike
[…] Part 3, Building and Provisioning the VSA […]
LikeLike
Thanks for this post. While I knew quiet a lot about the Nexentastor VSA by playing with it, I found a few jewel of information, that will help me rebuild a better VSA.
Thanks for the time and effort you put in this article.
LikeLike